3 Customizing
My setup
On my Mac, I use Z shell (zsh), which has been the default since macOS Catalina (you can set it as your default by following these instructions if you’re using an earlier version).
If you’re new to zsh, I highly recommend Armin Briegel’s eight-part blog series on the topic, Moving to zsh—also available as an ebook (Briegel 2020).
I manage my zsh plugins with the popular Oh My Zsh framework, and style my prompt using Powerlevel10k (p10k).
In place of the Terminal application that comes bundled with macOS, I use iTerm2, which you can download from its website, the App store, or (my personal preference) using Homebrew1:
brew install --cask iterm2I’ve been increasingly moving towards using Warp, which they describe as “a modern, Rust-based terminal with AI built in so you and your team can build great software, faster.” Honestly, it is pretty freaking cool! Even without its banner features (e.g. Warp AI command suggestions, Warp Drive workflows), it’s just a nice, fast interface.
You can download Warp from their site, or install it with Homebrew:
brew install --cask warp3.1 Oh My Zsh
Per the description in the Oh My Zsh GitHub repo:
Oh My Zsh is an open source, community-driven framework for managing your zsh configuration.
It’s like a meta-level tool for customizing your command-line experience with themes, plugins, commands, and more that pretty much work out of the box.
3.1.1 How to add custom plugins
As mentioned, Oh My Zsh comes with a boatload of plugins that live in ~/.oh-my-zsh/plugins, and can be enabled simply by adding them to the plugins array in your .zshrc.
However, sometimes there are plugins you want that don’t come bundled with OMZ. For example, zsh-autosuggestions is a must-have. It happens that zsh-autosuggestions has installation instructions for Oh My Zsh. The process is pretty much the same for any plugin: custom plugins go in ~/.oh-my-zsh/custom/plugins, and are enabled by adding them to the plugins array in .zshrc, just like the bundled ones.
Here’s the step-by-step for one I just enabled, zfunctions.
Clone the plugin from its repo into a folder of the same name in your custom plugins directory:
git clone https://github.com/zshzoo/zfunctions.git
~/.oh-my-zsh/custom/plugins/zfunctions
Add it by name to the plugins array in your
.zshrcand save the file.Reload your session by running
omz reload.2Test that it’s enabled by trying it out.3
(( $+functions[autoload-dir] )) && echo "zfunctions loaded" || echo "zfunctions not loaded"
# should return:
# zfuncions loaded
🎉 Tada! You’re done.
Adapted from How to install custom plugins and themes with Oh-My-ZSH by Lars Behrenberg.
3.1.2 How to organize settings with a ZSH custom folder
Bar the folder used for custom plugins (see Section 3.1.1), I’ve been storing all of my settings in my .zshrc dotfile. Functionally speaking, this is totally fine. However, that single file can get a bit unwieldy after a while. Luckily, Oh My Zsh comes with a $ZSH_CUSTOM variable that points to a directory (in my case, ~/.oh-my-zsh/custom4) where you can organize your settings into separate .zsh files that will be automatically sourced when ZSH starts up (see Better organize your ZSH settings by Liran Cohen for a more detailed description). 5
Let’s use aliases as an example. When you install Oh My Zsh, you’ll get a heavily commented-out .zshrc which includes settings to enable/disable, and outlines where you might want to put other customizations. This includes a section that begins:
# Set personal aliases, overriding those provided by oh-my-zsh libs,
# plugins, and themes.
If I had read things more closely, I would’ve noticed that it goes on to say that “oh-my-zsh users are encouraged to define aliases within the ZSH_CUSTOM folder.” But, since I didn’t have that many aliases defined at the start, it didn’t seem like a big deal.
To better organize these, I can simply cut the aliases out of my .zshrc and put them into a new .zsh file under my custom directory (~/.oh-my-zsh/custom/aliases.zsh).
To test that this worked, I’ll reload my session by running omz reload. Then I’ll run the command alias, which prints a full list of active aliases, and check that the aliases defined in my new file are included in that list.6
After writing this up, I actually ended up moving the location of my ZSH Custom folder, as it clashed with yadm, the dotfile manager I use (this has something to do with the fact that .oh-my-zsh has its own gitignore—the details of which are described in a yadm GitHub issue).
3.2 iTerm2
3.2.1 How to clear lines in iTerm2
In the terminal (in my case, iTerm2), the “normal” commands for selecting and deleting text don’t work. Though you can remap modifier keys to match the usual OS X shortcuts7, there are built-in shortcuts supplied that work well (as long as you remember them).
To clear the whole line, use Ctrl + U.
To restore the cleared command, use Ctrl + Y.
To remove the characters to the left of the cursor until the beginning of the word, use Ctrl + W.
Adapted from iTerm2 shortcut for deleting selected by ranjith.
3.2.2 How to modify iTerm2 key mappings
As per the previous section, some crucial key mappings don’t work out of the box in iTerm2. I was cool with this for clearing lines and commands, but not so much for jumping the cursor forward/backward by word or line. To create these in iTerm2 you go to Settings (Preferences) > Keys > + for Key Bindings.
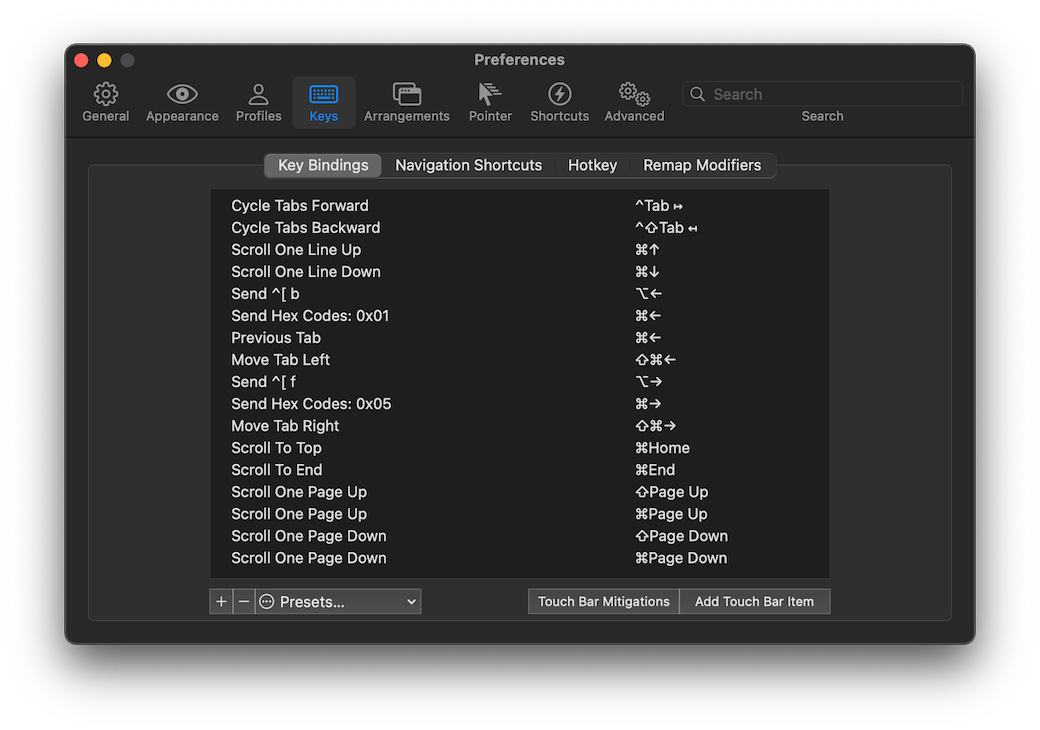
For moving the cursor by word, I wanted the following for left and right, respectively, which meant mapping them to the actions given in parentheses:
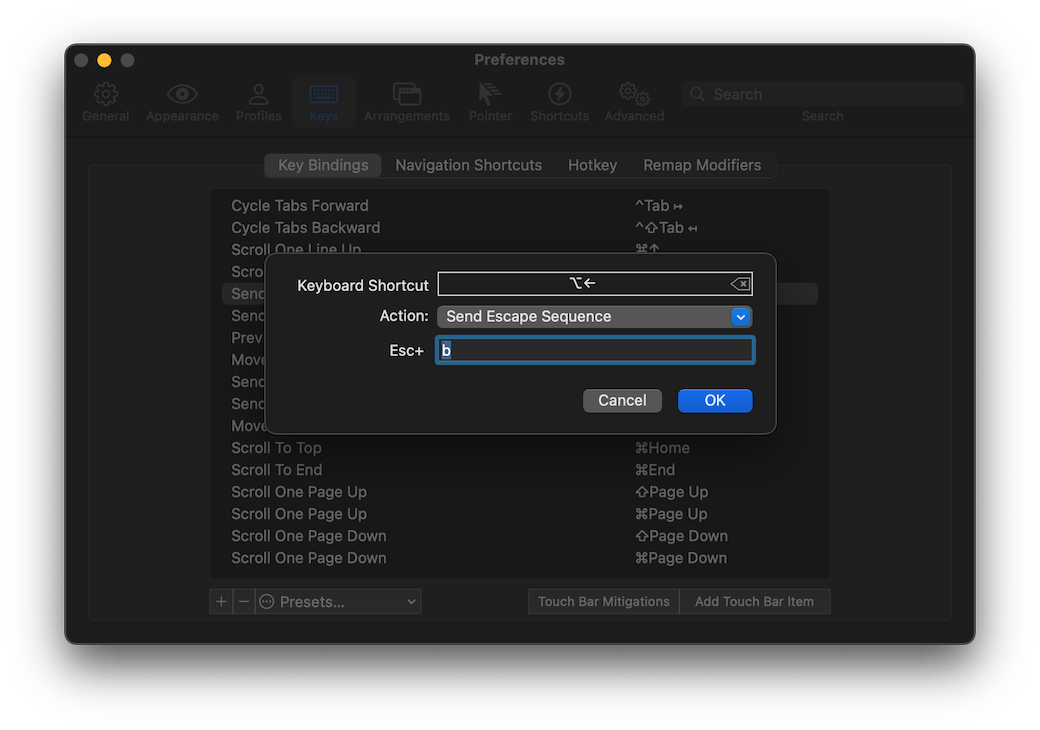
⌥ + ← (Send Escape Sequence: b)
⌥ + → (Send Escape Sequence: f)
For moving the cursor by line:
⌘ + ← (Send Hex Codes: 0x01)
⌘ + → (Send Hex Codes: 0x05)
In iTerm2, once you hit the plus button to add a new key binding, the interface will have three parts: a section to record the new Keyboard Shortcut, an Action drop-down, and a place to add the appropriate key or code to the action (to accompany the escape sequence or which hex code to send in our examples).
Adapted from 5 must-have key mappings on iTerm2 to be more productive by Koji Kawamura.
These shortcuts work by default in Warp. So, that’s one in their win column, if you’re looking for a reason to switch over.
3.3 How to condition a setting on the terminal program
Though I love iTerm2, I’ve recently been experimenting with a (relatively) new terminal program, Warp. Warp has a bunch of super cool features—the command palette, workflows, and A.I. command search are among my favorites—but its prompt did not support Powerlevel10k (which is what I use in iTerm2).
As of July 2023, Warp supports Powerlevel10k (using p10k versions ≥ 1.19.0)! I’m leaving this section in for reference, since it could be handy for other scenarios.
If you want to use p10k with Warp, you can check out Melanie Crissey’s intro post in the Warp blog, How to enable Powerlevel10k in Warp to make your zsh prompt more beautiful and useful, or see the Powerlevel10k section of the Warp prompt documentation.
There’s a workaround for disabling p10k when Warp is in use:
rc file
if [[ $TERM_PROGRAM != "WarpTerminal" ]]; then
##### WHAT YOU WANT TO DISABLE FOR WARP - BELOW

    # POWERLEVEL10K

##### WHAT YOU WANT TO DISABLE FOR WARP - ABOVE
fi
Of course, anything could go in that block, and/or you could set your condition on a different terminal program. Likewise, you can add an else clause to say what should happen if the condition is not met. You can expand the code below to see what I ended up adding to my .zshrc.
View code
.zshrc
if [[ $TERM_PROGRAM != "WarpTerminal" ]]; then
ZSH_THEME="powerlevel10k/powerlevel10k"
else
ZSH_THEME="passion"
fiThe generic how-to for installing macOS apps with Homebrew is covered in Section 5.1.↩︎
omz reloadjust runsexec zsh, but it’s easier to remember, and is built right into Oh My Zsh. It’s one of the first things in the OMZ Cheatsheet, and helps you remember that you should NOT runsource ~/.zshrc.↩︎Usually I do this just by running one of the commands, but the zfunctions README came with this suggested test.↩︎
I believe this is the default, but you can find out what yours is by running
echo $ZSH_CUSTOMin the terminal, or put it in a different directory by manually setting the variable in your.zshrc.↩︎This folder can also be used to override OMZ’s existing plugins, themes and internals, which is described in the Oh My Zsh Customization documentation, but is beyond the scope of what I use it for.↩︎
You could also just test out one of the aliases you’ve defined—whatever floats your boat.↩︎
See Word/line deletion and navigation shortcuts in iTerm2 by Levi Tan Ong if that’s what you’d like to do.↩︎